Imagine completing your latest project after a long day of mixing, cranking the volume knob up to 10 and appreciating your hard day’s work. Who doesn’t love blaring their speakers to an awesome mix once in awhile? But doing so could mean more than missing out on the perfect mix, it could also cost an audio engineer their career.
The ideal listening levels can vary greatly depending on the space, equipment, and purpose of the listening session. We will explore listening levels in the context of a bedroom studio. The levels discussed are referencing studio monitor volume and not headphones. When mixing with headphones, be weary of volume and time spent wearing them. Read the product’s manual to find ideal listening volumes and try to maintain relatively low levels.
Loudness and Hearing Loss
First, we need to understand the concept of loudness and its effect on our perception of the music as well as our hearing. To begin, there are two forms of audio metering: peak, which is the far more prominent default in DAW’s, and loudness unit metering or LU meter for short. While peak metering is instantaneous, it is not reflective of how humans experience volume, unlike LU metering, which reflects volume over time.
The way humans perceive loudness causes excitement with an increase in volume, meaning that everything that is played louder sounds better to us. Though this psychoacoustic phenomenon is often utilized by music creators and sound designers alike, it can be detrimental in a critical listening environment. Not only do higher volumes inaccurately reflect a mix, they can also lead to hearing fatigue or, in severe cases, hearing loss.
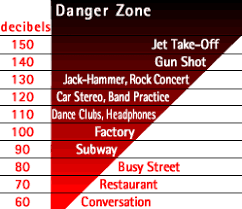
The CCOHS indicates that an individual should spend less than 2 hours listening to an SPL (Sound Pressure Level) of 100 dB, or less than 8 hours at a level of 90 dB. This is extremely important to note, as headphones at full volume reach levels as high as 110 dB, which should not be listened to for more than half an hour. For reference, a busy street resides at around 80 dB whereas a rock concert rests just above headphones at full volume, at around 130 dB. Be wary of loud volumes and protect your hearing.
Finding the Perfect Volume
Now that we have an understanding of the dangers of incredibly loud listening environments, we can delve into solutions and proper levelling. While it is generally agreed that the flattest frequency response for human hearing rests around 85 dB SPL, this can seem excessively loud in a small space. Many small recording studios may calibrate to 70 SPL, but for a bedroom studio it may have to be even lower. As a general rule, it should be comfortable to speak over a mix without having to strain or raise your voice. These lower levels will not only ensure an accurate representation of the mix, they will also prevent hearing damage and fatigue. That being said, it is still advised that you take several breaks when mixing for prolonged periods of time.
Gain Staging
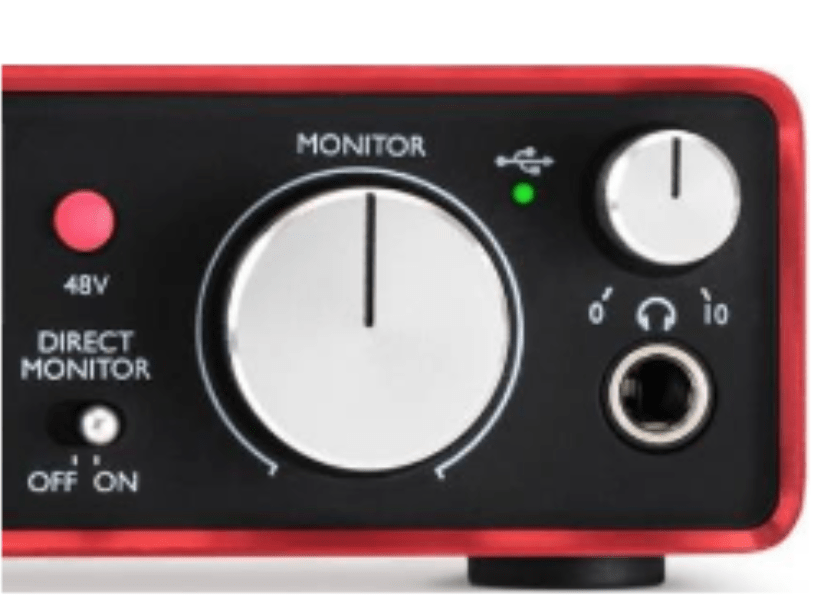
Gain staging your speakers with an audio interface with both hardware and software controls can be a little tricky. The following is an in-depth look at the process. As examples, we will be using the Focusrite Scarlett 2i2 and the RME Fireface 802. For the Focusrite Scarlett, you should set the Monitor knob to nominal. If you are unsure where the nominal setting is, most times a “U” will indicate unity or 12 o’clock is a good rule of thumb for ensuring adequate headroom. This same logic can apply to the RME Fireface, or software controls. Simply set your master fader in “Total Mix” to nominal level or unity gain.
Calibrating Speakers
In order to calibrate your speakers, you will need an SPL meter set to C-Weighted and a pink noise generator either as a standalone or through a DAW. First, power on your speakers and set their volume to 0. Place your SPL meter at the listening position, ensuring you have it set to a slow response. Following that, play pink noise at -20dB RMS and pan it hard left. Now, begin slowly raising the volume knob of your left speaker until the SPL meter reads 82 dB (or less if you are in a particularly small space). Once this is complete, mark the level on your speaker and repeat this process on the right speaker. With both speakers on, your SPL meter should read 85 dB.
Workflow
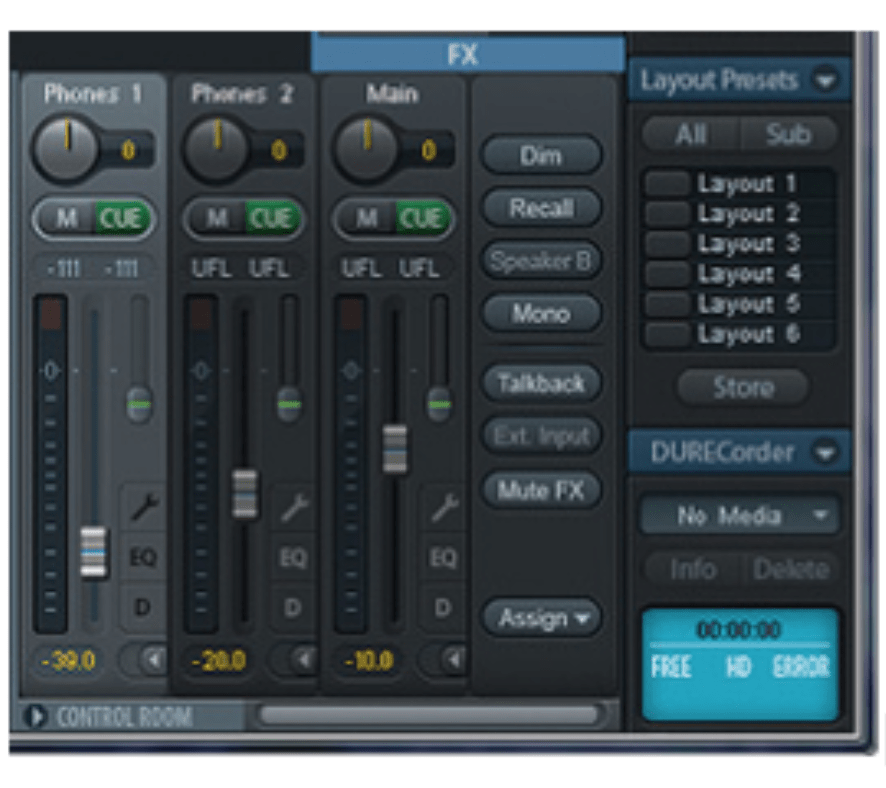
Now that we have our speakers calibrated to unity gain, let’s analyze a typical workflow. Most software mixers have a dim function, which allows you to have a loud volume that can then help to easily drop your volume by 10 dB or 20 dB for a low listening level. You can accomplish this with the Focusrite Scarlett by repeating the calibration process and lower the master volume knob by 10 dB, making an additional marking. This will allow you to have high, medium and low mixing levels easily accessible for both mixing and presenting to clients. It’s good to note that these volume knobs are not meant to be mixing tools. When working in a session, set your speakers and interface to their designated level and mix using the track faders. This will ensure your mix is consistent and you are not fooling your hearing by constantly adjusting macro volume settings.
Next Steps
By now, you have set the ideal listening level for your speakers. With a calibrated system and sense of proper listening levels, you can take out the guessing game when mixing your next project and keep on mixing without the risk of hearing loss. The next step in your home studio process might be to explore differences in new monitors and potentially correct the acoustic treatment in your space. If you’re looking for more tips on how to make the most of small spaces, check out “How to Build a Home Studio Anywhere: Maximizing Small Spaces“.
Illustration by Yihong Guo