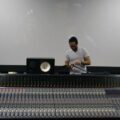
There can be a lot of variables that shift around from session to session when it comes to pro vocal recordings. The microphone, preamp, position, and voice selection will all switch up depending on the aesthetic of the song.
However, one thing stays incredibly consistent in all of these ever-changing decisions: how well the room is acoustically treated to capture the voice and monitor the performance.
A lot of modern producers will be recording in makeshift spaces and immediately think they should stuff their singer into a separate closet for isolation. Experience has taught that optimizing a single larger space into a room that accommodates for both tracking and recording ends up producing much better results.
Nothing is More Important than the Room You Choose
We often think that buying a very expensive microphone or preamp is going to guarantee us an amazing recording. The fact of the matter is that this should be the final consideration when preparing for a pro vocal session.
An SM57 paired with a complimentary voice in a treated room will often sound better than a U47 in an untreated room any day. Controlling your acoustical environment can be a boring pain, but it is truly the one approach that will propel your next vocal tracking session to pro levels.
Sometimes Bigger IS Better
Early room reflections are your arch nemesis. When your singer is in a very tight space, it will cause several early reflections to cascade over one another, creating a very out-of-phase-sounding environment due to comb filtering. Sure, room reflections still exist in larger rooms. However, they are more spaced out, giving us more control over how to absorb and diffuse them.
We want to capture the sound of the space the singer is in, but we want to make sure that space sounds tight, open, and clean. Finding a bigger room will always be the first step to a successful session. This will allow the singer’s energy to move out in all directions before bouncing back into the microphone and causing havoc.
Acoustic Treatments
We often try to use the quickest solutions when it comes to acoustic treatment. Sometimes we’ll use what’s laying around the house like blankets, egg cartons, or a mattress. Other times, when people decide to spend some money, they will try to pay as little as possible and purchase a bunch of foam to stick to their walls.
The truth is that paying for proper treatment and taking the time to set it up right is still much cheaper than running out and buying an expensive mic/pre combo. Johns Manville or Owens Corning rigid fibreglass panels are absolute miracles.
2” thick panels will absorb the lower-mid to treble range
4” thick panels will absorb the upper bass range
6” thick panels will absorb a fair amount of the primary bass
24” x 48” panels with a breathable fabric is the best option for construction. This keeps panels big enough to be effective, but small enough to move around. You’ll need at least 4-6 of these, but having 12 really opens up your possibilities.
A smaller number of panels will cost you around $200 if you’re happy rearranging things depending on the needs of the moment. You can place them around the singer while they perform, and then move them back out to the walls when you’re ready to mix.
Buying 12 panels will cost you more, but it will allow you to have monitoring positions treated at the same time as having absorption ready for the performer. Either approach is still the most cost-effective investment you can make to start creating professional-quality tracking environments.
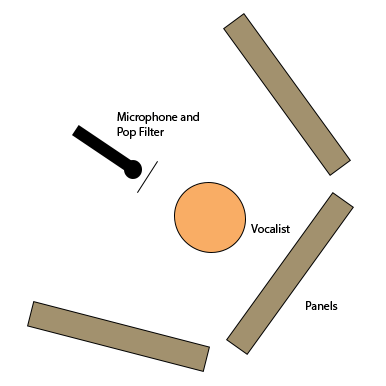
Placement Is Just as Important as the Size of the Room
It’s advantageous to place panels on movable stands. This allows you to set up your room a bit differently from artist to artist, as well as allowing you to open your room back up when mixing.
Step 1
Start by placing panels at the first reflection points near the walls of the room to minimize early reflection points. It’s often best to measure these points by the space between your listening position and your speakers. This means you’ll need some on the walls behind you as well as placing panels to the left and right of where the speaker would bounce off the walls and back at your ears. This will keep the playback in the room fairly tight and tends to also translate well for the singer.
Step 2
Next, you’ll need to set up a makeshift “booth” for your singer somewhere just off the center of the room. Remember that when using a directional microphone, you won’t need to absorb the area near the rejection of the pattern. It’s best to place the panels behind the singer in a half circle or trapezoidal layout. This will help minimize the amount of sound waves bouncing back into the microphone. If you have a singer who moves a whole lot you may want to eliminate proximity effect by using an omni pattern. Remember though, in this scenario you will need to absorb from all directions.
—Final notes—
At the end of the day, a great vocal recording stems from a well-treated space, an experienced singer, and an engineer who can make that performer comfortable. By making your acoustical treatment a priority, you will step your home studio up into the same ranks as a high-budget studio. You will come to find that your vocal tracks are mix ready and require less processing if you spend more time setting up sessions with reflections/absorption as the main issue to tackle.
Illustration by Yihong Guo